Showing posts with label Garlic. Show all posts

Thursday, December 3, 2009

Roasted Tomato Soup

Ok, I’m back, and this time with some really great soup. I got the recipe from here, and made only a few modifications. I added some roasted corn, from one cob. I also pureed everything using a stick blender directly in the pot, rather than transferring it all to a blender.

Roasted Tomato Soup

3 lbs Roma Tomatoes, halved
3 Cloves Garlic, whole
1 Yellow Onion, halved and quartered
5 Tbsp Olive Oil
4 1/2 Cups Chicken Stock
2 - 3 Sprigs of Fresh Thyme
1/2 of a Chipotle chili in Adobo Sauce, seeded
Kernels from one ear of corn, roasted
Sea Salt to taste
Freshly Ground Black Pepper
Finely chopped basil (fresh or dried)

1. Preheat oven to 400. Put tomatoes, onions, garlic and thyme in a roasting pan, toss with olive oil, and place in the oven. Roast for about 30-35 minutes. Remove the skin from the garlic and discard the thyme.

2. In a large pot combine the roasted veggies with the chicken stock. Bring to a simmer. Add the corn and chili. Puree with a stick blender.

3. Remove from heat and let cool to an edible temperature. Garnish with salt, pepper, and basil (some chopped bacon would be a good addition too).

Thursday, September 10, 2009

One Quiche, Two Quiche


Since everyone was back in town once school started back up, I threw a potluck. People brought lots of food, and a good time was had by all. I followed my traditional potluck style and made an entrée, and a dessert. This time for the entrée I decided to make two quiches. First, I made a pesto and goat cheese quiche with caramelized onions, and then I made a broccoli and garlic quiche with cheddar. Unfortunately the pictures are a little lacking, since I didn’t cut them until it was time to serve, at which point people dug in with a gusto which left no leftovers. The plus side is that it certainly seemed to mean that people liked the quiches (I sure did), and I would recommend them to anyone. If you’ve never tried making a quiche, it is remarkably easy, and if you’re lazy like me you can use a frozen, store-bought pie crust to make things even simpler.

For the pesto quiche I used homemade pesto, but you can just as easily use store brought if you don’t happen to have any around. I got the instructions for caramelizing onions from simply recipes. The one change is that I found it too

Goat Cheese and Pesto Quiche

1 deep dish pie crust, frozen
½ a large red onion, sliced into thin strips
2 tsp olive oil
½ tsp balsamic vinegar
¼ cup pesto, divided
5 oz goat cheese, room temperature
1 ½ cups low fat sour cream
6 large eggs, lightly beaten
1 large tomato, sliced into quarter inch thick slices

1. Preheat oven to 375 degrees. Put oil in a medium, heavy bottomed saucepan over medium heat. Add onions and a little salt. Cook for 10 minutes, stirring occasionally. Reduce heat to

medium low and continue cooking for another 30 minutes, until onions are well browned, stirring occasionally. Add the balsamic vinegar, and cook for another 10 minutes. Remove from heat.

2. While the onions are cooking, blind bake the pie crust. To do this, poke holes in the bottom

of the crust with a fork. Line the crust with tin foil or parchment paper, pushing all the way into the corners. Fill the pie crust with pie weights or dried beans. Bake for 15 minutes. Remove from the oven, and let cool briefly. Remove the pie weights or beans, and place the pie back in the oven for another 10 minutes. When this is done, turn the oven up to 400 degrees.

3. Put one T of the pesto into the pie crust. Using a pastry brush, spread the pesto around the inside of the quiche, trying to cover the entire bottom as well as the sides.

4. In a large bowl, whisk together the goat cheese (it really just turns into small crumbles) and the sour cream. Add the remaining pesto and the eggs, and whisk until thoroughly combined. Stir in the caramelized onions.

5. Layer the bottom of the quiche with the sliced tomatoes.

6. Pour the quiche filling over the tomatoes (you will probably have a little extra).

7. Bake for 1 hour to 1 hour 15 minutes. It’s done when the edges are set, but the center is still a little shaky. I should note that my quiche souffléd like crazy (it rose a good two inches, probably means I overbeat the eggs, that’s why I’m saying you should beat them lightly before adding them), which made it hard to tell when it had reached this point. I took it out after an hour 10 and it was fine (and fell back down to normal levels). Cool until just warm and serve.


Brocolli-Garlic Quiche

1 deep dish pie crust
1 cup broccoli florets, 1-2 inches of stem attached
3 cloves raw garlic
5 cloves roasted garlic, divided
6 large eggs
1 ½ cups half and half
¼ tsp ground nutmeg
¼ tsp cayenne
8 oz shredded cheddar cheese.

1. Preheat the oven to 375. Blind bake the pie crust. To do this, poke holes in the bottom of the crust with a fork. Line the crust with tin foil or parchment paper, pushing all the way into the corners. Fill the pie crust with pie weights or dried beans. Bake for 15 minutes. Remove from the oven, and let cool briefly. Remove the pie weights or beans, and place the pie back in the oven for another 10 minutes. When this is done, turn the oven up to 400 degrees.

2. While the crust is baking, bring 3 quarts of water to a boil. Add the broccoli, and cook for 4 minutes.

3. With a generous pinch of salt, chop up the raw garlic until you make it into a paste. Mush in three cloves of the roasted garlic.

4. Take the remaining two cloves of roasted garlic and place them into the pie crust, using your fingers, gently crush them, and do your best to spread them around the bottom of the crust, without breaking it (this is a challenge).

5. In a large bowl, whisk together the eggs and heavy cream. Add the garlic paste, nutmeg, and cayenne.

6. Line the bottom of the crust with half of the cheese. Pour over the egg mixture. Place the broccoli in the quiche, and cover with the remaining cheese (that has not yet been done in the picture below).

7. Bake for 1 hour to 1 hour and 15 minutes. I found this quiche souffléd a lot as well, but I took it out after an hour, and it seemed well set (maybe because it was on the upper rack, and so cooked a little faster). Cool until just warm and serve.

Sunday, October 12, 2008

Butternut Squash Lasagna


As part of the dinner party of the disastrous doughnut adventure (see my previous post) I also made an entrée. Unlike the doughnuts, this was delicious. I based my lasagna on a recipe from epicurious, but I tweaked it significantly, mostly in adjusted the béchamel. I added a number of cloves of roasted garlic to the sauce, as well as a few other spices to give it kick. I also made one and a half times the original recipe for the sauce, as the comments suggested that the recipe as written didn’t provide enough. I had more than enough sauce making one and a half times the original, but the leftover is sitting in my fridge waiting to adorn a sandwich, so I’m certainly not considering it a waste.

Butternut squash, hazelnut, and roasted garlic lasagna

Makes on 9 x 13 dish

For squash filling
1 large onion, chopped
3 tablespoons unsalted butter
3 lb butternut squash, peeled, seeded, and cut into 1/2-inch pieces
1 teaspoon minced garlic
1 teaspoon salt
1/4 teaspoon white pepper
2 tablespoons chopped fresh flat-leaf parsley
4 teaspoons chopped fresh sage
1 cup hazelnuts (4 oz), toasted, loose skins rubbed off with a kitchen towel, and coarsely chopped

For sauce

1 teaspoon minced garlic
4 1/2 tablespoons unsalted butter
7 1/2 tablespoons all-purpose flour
1 1/2 cups milk 
5 cloves roasted garlic
2 bay leaves (not California) 
1 1/2 teaspoon salt
1/4 teaspoon white pepper 
½ teaspoon smoked paprika 
½ teaspoon nutmeg 
Cayenne Pepper to taste

For assembling lasagne

¾  lb fresh mozzarella, coarsely grated (2 cups) 
1 cup finely grated Parmigiano-Reggiano (3 oz)  
5 oz. Goat cheese, crumbled
12 (7- by 3 1/2-inch) sheets no-boil lasagne (1/2 lb)

1. Preheat oven to 425 degrees. Sauté the onion in the butter until golden, about 10 minutes. Add the garlic, pepper, salt and the squash and sauté until squash is tender, 15-20 minutes. Put in a bowl and mix with the sage, parsley and nuts. Set aside.

2. Over medium heat melt the butter with the garlic and cook for one minute. Add the flour and whisk the roux for three minutes. Add the milk in a slow stream, whisking constantly. Turn the heat up to medium high, continue whisking. Let the milk come to a boil, and reduce the heat until the milk is just at a simmer. Add the roasted garlic and the remaining spices. Continue cooking, whisking constantly and being sure to scrape the bottom, for another 10 minutes.

3. Mix the parmesian, mozzarella, and goat cheese in a bowl. Pour ½ cup of the béchamel sauce into the bottom of a buttered, 9 x 13 baking dish. Place three noodles over the sauce, leaving spaces between them. Pour an additional 2/3 of a cup of the sauce over the noodles. Spread 1/3 of the filling over the sauce. Spread a quarter of the cheese mixture over the filling. Repeat the process two more times, beginning with the noodles. Once you have three layers, top the lasagna with the remaining three noodles. Cover the noodles in sauce (I would not recommend using the entire remainder, but feel free to be generous. Top the lasagna with the remaining cheese. At this point the lasagna can be refrigerated if not being used immediately.

4. Cover the lasagna with foil and put it in the oven for 30 minutes. Remove the foil and cook for another 10 minutes, or until cheese is bubbly. Serve hot.

Thursday, August 28, 2008

Hummus!


Hummus has for a long time been one of my favorite snack foods. When it’s done well it tastes heavenly. Unfortunately, when it’s done poorly it tastes bitter, or like oil. In neither case something you really want to eat. I was having some friends over tonight, and decided I should try my hand at it. I’d never tried before, but the recipes I found online seemed fairly straightforward. I ended up selecting one that was part of a sandwich recipe on epicurious, but I changed it around a little to suit my tastes (as well as doubling it). One thing I did ad was powdered sumac, a slightly tart, Middle-Eastern spice I was able to get at a local specialty store. The Tahini was a little more expensive, but if you live near a decent grocery store that sells it, you will probably do better than I did. Serve this with pita wedges that have been toasted in the oven.

Hummus

Makes 4 ½ cups

2 16 oz. cans chickpeas (Garbanzo beans), drained and rinsed, juices reserved
4 cloves garlic
½ cup well stirred
Tahini
¼ cup fresh lemon juice
¼ cup olive oil
¼ cup freshly chopped parsley
2 tsp Sumac Powder
Salt and Pepper to taste

1. Finely chop the garlic, then mash it into a paste with a pinch of salt.

2. Put the chickpeas, garlic paste, Tahini, lemon juice, and olive oil in the bowl of a food processor, and process until smooth.

3. Add 6 Tbs of the reserved chickpea juice (use water if you didn't save it), the parsley, the sumac powder, and salt and pepper to taste. Pulse to combine.

4. Enjoy

Monday, June 23, 2008

Roasted Garlic Pizza with Veggies


This is the first of the three pizzas I’m posting about this week. For background, as well as cooking instructions and the dough recipe, check out the introductory pizza dough post.

I got the idea for this pizza from one of my favorite pizza places I ate at when I was a kid. There was a restaurant I my home town called Bertuccis (this is not the chain restaurant Bertuccis that you sometimes see around). They made a number of wonderful pizzas (including a to die for clam pizza I hope to recreate someday). One of my favorites was a pizza with chicken, red peppers, and broccoli. I don’t remember what the sauce was, but I know it wasn’t tomato. I embarked on this pizza hoping to recreate just a little of that childhood memory, though I skipped on the chicken because I had some vegetarian friends coming. I thought this pizza was tasty, but not my favorite. I made it with a roasted garlic béchamel sauce, white onions, broccoli, and red peppers. If anything, it could have used something to give it a little more kick (this can be solved with the addition of some red pepper flakes to the top), and maybe just a little salt. This pizza was also the one that faired the poorest on reheating. Still tasty though.

Roasted Garlic Béchamel Sauce

Makes ~ 1 cup

2 Tbs unsalted butter
2 Tbs all purpose flour
1 cup milk
~ 10 cloves roasted garlic
1 tsp chopped fresh garlic
1/3 cup grated parmesan cheese
Salt to taste

1. Melt the butter over the heat. Once completely melted, stir in the flour. Cook briefly, (45 seconds to a minute) stirring constantly. Do not allow the flour to color.

2. Add the milk and whisk to combine. Add the roasted and fresh garlic. Add the parmesan, and salt to taste. Let the mixture get hot enough that it just starts to bubble.

3. Pour the heated sauce into a blender, and mix until smooth. This step is optional, skip it if you want chunks of roasted garlic in your sauce.

Roasted Garlic Pizza with veggies

Makes one ~14 inch pizza (my pizza’s were irregularly shaped, makes it hard to guess a size)

Rolled out Dough for one pizza
½ cup Roasted Garlic Béchamel sauce (see above)
½ medium white onion very thinly sliced
2-3 Tsb chopped garlic (use as your taste prefers)
2 cups broccoli (just the florets)
½ red bell pepper, sliced
1 ½ - 2 cups Cheese Blend (see Dough post)

1. Use a pastry brush or spoon to spread roasted garlic sauce all over the pizza. Be generous.

2. Add the raw garlic, followed by the white onion, then the broccoli and red peppers. Top it all off with the cheese.

3. Bake for approximately 10 minutes, or until dough is cooked and cheese is melted (see dough post for more details).

Wednesday, May 21, 2008

Spinach Gnocchi with Spicy Garlic Marinara


It's my first post that's an entree. Huzza! Of course it comes promptly after I got a nod from cupcakes take the cake. It wasn't much, but it massively upped my readership, at least for that day.

I threw a dinner party last Saturday, and decided to make a mess of food. I was only feeding six people, but I wanted to make enough to bring back to Richmond (I’m subletting a place there), and feed myself for the week. I decided to make something that would transport and keep easily. I’ve been wanting to try making Gnocchi for awhile now, so I made spinach gnocchi with roasted garlic marinara sauce. The gnocchi was pretty good, but the pasta sauce was excellent. As noted, I made ridiculous quantities of these foods. I’ve tried to reduce the recipes to more reasonable proportions here, but be aware that the pictures I’ve posted are from making a mess of sauce and 5lbs potatoes worth of Gnocci.

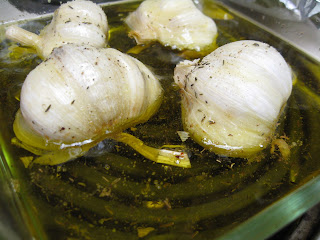
To make the pasta sauce I used home made roasted garlic and roasted garlic oil. It’s really easy to make yourself. I used the recipe here, but only made 2 heads of garlic worth.

Spicy Roasted Garlic Marinara Sauce

Should make ~4 servings

2 Tbs roasted garlic oil
1 Tbs olive oil
¼ head roasted garlic
2 cloves raw garlic, lightly crushed
1 28-oz can skinned, whole, plum tomatoes, packed in tomato juice and basil
½ tsp red pepper flakes
¼ tsp Oregano (or to taste)
Salt and pepper to taste

Here's the garlic roasted in Oil:

1. Put two tablespoons of oil in a medium sauce pan over medium-low heat. Put the roasted and raw garlic in the pan and let simmer until the garlic begins to turn golden, stirring occasionally.

2. Drain the can of tomatoes and reserve the juice (you’ll probably throw it away, but if you want your sauce to be more liquid, you can add it later. Add the tomatoes to the pan, and turn the heat up to medium high. Using a masher or a big spoon, mash up some of the tomatoes until you get the consistency you want. The heat will also break the tomatoes down.

3. Add the red pepper flakes, oregano, salt and pepper, stir to combine. Bring the sauce to a simmer, and reduce until you get a consistency you like. I probably reduced it for about 10 minutes. Stir occasionally to prevent burning.

4. Serve sauce warm over Gnocchi, or whatever other pasta you are serving.


Spinach Gnocchi

Makes 2 main course servings

1 Lbs potatoes (use Idaho or Russet DO NOT USE WAXY POTATOES)
10 oz Spinach (I used frozen)
~1 cup flour
Salt, Pepper, and Nutmeg to taste

1. Put the potatoes into a pot of boiling water. Boil for 35-45, or until tender.

2. Wilt the spinach, either by thawing it in the microwave if you’re using frozen, or by putting the spinach into boiling water for a minute, and then submerging it in ice water, if you are using fresh. Chop the spinach up very finely.

3. Once the potatoes are ready, take them out of the water and skin tem one at a time. It is important that the potatoes still be hot when they are riced, so this needs to be done quickly. Move the potatoes using tongs, and hold them using oven mitts. Chances are you will burn yourself doing this. Once you’ve taken the first potato out, you may wish to turn the heat down under the remaining potatoes.

4. As each potato is peeled, put it through a ricer. If your ricer has multiple size options, use the smallest holes available. Continue until all the potatoes are riced.

5. Mix the riced potatoes with the spinach, a generous amount of salt, the pepper and the nutmeg. Kneed the ingredients together. Add half a cup of flour, and kneed it into the dough. Different people will require different amounts of flour. Keep adding until the mixture takes on a sticky dough like quality. The best way to test when you’ve added enough flour is just to pinch off some dough, roll it into a bowl, and put it into some boiling water. If the gnocchi stays together, there is enough flour.

6. Other recipes suggest rolling the dough into long ropes ½ an inch think, and then cutting the ropes into ¼ inch segments. I just rolled the dough into small balls in my hands. Place the balls in one layer on a cookie sheet or in a casserole dish. Try not to let the balls touch each other, or they will stick

7. To cook, place the gnocchi one at a time into a pot of salted, boiling water. After a minute or so the gnocchi should begin to float. After another minute or so remove the gnocchi with a slotted spoon. Let cool and serve with the sauce.

I don't know why, but sometimes blogger automatically rotates my photos, sorry this one is sideways.