Friday, May 30, 2008

Sunday Night Chicken Korma


I went to the store today not sure what I was going to make for dinner, but not wanting to have to buy a lot of ingredients. I bought a package of chicken thighs, and two small cups of yogurt. Beyond that I just wanted to rely on whatever I had in my house. I decided to try to make chicken korma, one of my all time favorite Indian dishes. It’s a mild curry, flavored with nuts. I thought the result was ok, but could use a little modification. The recipe would have been better if I had used fresh instead of powdered ginger, had cashews, onions, coriander, or a little extra garlic. Anyway, here’s the recipe as I made it. It’s not a bad start on a Chicken Korma recipe. I served it over rice.

Chicken Korma

4 cloves garlic
3 cloves roasted garlic
1 cup yogurt
½ Tbs powdered ginger
½ tsp turmeric
½ tsp chili powder
3 chicken thighs, cut into small chunks

1/3 cup skinned almonds
¼ cup cream

2 Tbs canola oil
1 tsp ground cardamom
1 tsp cumin powder
¼ tsp bay leaves
Salt & pepper to taste
¼ tsp garam marsala
Pinch cinnamon
¼ tsp corn starch

1. Lightly crush the raw garlic. Put it in a food processor with the yogurt, roasted garlic, ginger, turmeric, and chili powder. Mix them all thoroughly. Put them into a non-metal bowl with the cut up chicken, cover in plastic wrap, and marinate the chicken for a few hours.

2. Put the almonds and ¼ cup of cream in a blender and mix on high power. Ideally you want a smooth cream, but mine still had some chunks of almond in it. Put the mixture aside

3. Put the oil in a skillet over medium high heat. If you’re adding any onions or extra garlic, sauté them in the oil. Add the spices to the oil and fry them for about a minute. Add the marinade and the chicken to the pan. Turn down the heat to medium, and stir thoroughly. Let the mixture simmer for 20-25 minutes. Make sure the chicken is cooked fully, and that the sauce has come to a simmer (it was marinating raw chicken after all).

4. If you feel the sauce needs thickening, add the corn starch.

5. Serve over rice.

Wednesday, May 28, 2008

Mexican Chocolate Cupcakes - A Cupcake Hero Event

As part of my continuing effort to get my blog out into the world, I’m entering this month’s Cupcake Hero event, hosted by quirky cupcakes. The theme this month is cocoa powder. I had a fairly short amount of time between discovering this contest last week, and getting an entry in by May 30, and so I decided to go with an old favorite: Mexican Chocolate Cupcakes. I’ve made these cupcakes 3 or 4 times now, and used the basic chocolate cake in other recipes, because it produces such a moist cupcake.

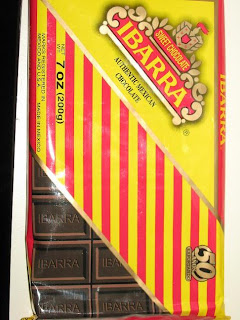
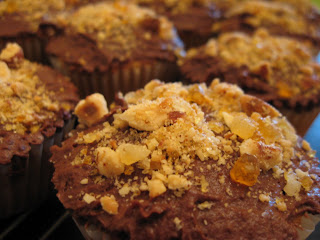
This recipe combines chocolate with cinnamon, vanilla, and chili powder to create a cupcake that has a very warm feel to it, which is really the only way I can think to describe it. The cinnamon and chocolate in the cupcakes give them a nice flavor, which is given a bite by the ancho chili powder and cayenne in the ganache frosting. All the spices really serve to bring out the flavor of the cocoa. I topped these with chunks of Mexican chocolate I got at a local grocery store called “Foods of All Nations,” but you could probably find some at any Mexican Grocer. These cupcakes will also fill your house with the wonderful smell of baking cinnamon and chocolate as they cook.

A note on spices: when it comes to spices, I tend to think it’s a more a matter of personal preference than of following a recipe. I like these cupcakes pretty heavily spiced, but the levels can be adjusted to your own preferences. If you’re not afraid of raw eggs (I’m not), taste the batter to see if you think it has enough cinnamon. And make sure to taste the ganache, because it has chili powder in it, which might scare some people away. For the frosting I would start on the low side with the chili powders, then gradually add more until you like the taste you have.

Mexican Chocolate Cupcakes

Makes 14 cupcakes

1 stick (1/2 Cup) unsalted butter
¼ Cup cocoa powder
3/8 Cup of water
1 Cup sugar
1 egg
¼ Cup well shaken buttermilk
1 Tbs vanilla paste (or extract)
1 Cup all purpose flour
½ tsp baking soda
2 heaping tsp cinnamon (Use good quality cinnamon for this if you can get it. It’s worth it. I used Siagon Cassia)
1/8 tsp Salt

1. Preheat the oven to 350 degrees. Melt the butter in a heavy bottomed sauce pan over low heat. Add in the cocoa powder and whisk until smooth. Then add the water and mix until smooth again. Remove from heat

2. One at a time mix in the sugar, egg, buttermilk, and vanilla

3. In a bowl, whisk together the flour, baking soda, cinnamon, and salt

4. Sift the dry ingredients over the wet, and whisk until well combined.

5. Fill cupcakes using a ¼ cup measure. Bake for about 18-20 minutes, or until a tester comes out clean. Let them cool thoroughly before frosting.

Chocolate – Chili Ganache

2/3 cup heavy cream
6 oz semisweet chocolate
2 Tbs butter
1 Tbs Ancho Chili powder (I would not recommend subbing in regular chili powder here, the taste is very different)
A pinch of cayenne pepper (this will make it hot fast, use it to your tastes)

1. Put the cream and butter in a small, heavy bottomed sauce pan over medium heat. Bring the cream to a simmer.

2. Put the chocolate and chili powders in a heat proof bowl. Pour the heated cream over the chocolate. Let the mixture sit for a minute, then whisk together.

3. Taste the ganache, add more chili powder to suit your taste. Be aware that it will get spicier when it cools off

Assembly

1. Use an offset spatula to frost the cupcakes. Try to be gentle, these cupcakes are a little delicate, and if you frost them with too much force, you might tear the cupcakes in half.

2. Put a piece of chocolate on the top of the cupcake.

Sunday, May 25, 2008

Mimosa Meringues


This is an extension to the champagne meringue frosting I made for my last post, and an extension to my Sugar High Friday post. If I could add champagne to powdered egg whites, why not a mixture of champagne and orange juice to make mimosa meringues. The result was underwhelming, but I think that might be the result of my inexperience with meringue cookies. The meringues lacked that nice chewiness I’m used to in the center of a meringue. They were also a little coarse. My two guesses as to what went wrong are that I didn’t put in enough sugar, or that I over cooked them. Anyway, the recipe is below, and I would encourage someone who knows more about meringues than I do to play around with this, because I think a lot of potential exists here

Mimosa Meringues

Makes ~30 cookies

1 ½ Tbs egg white powder
¼ Cup dry champagne
1/8 Cup pulp free Orange Juice
2 Tbs superfine sugar

1. Preheat the oven to 200 degrees. Mix the orange juice and champagne in a measuring cup. You want a total of 3/8 cup of liquid, adjust the ratios of champagne and OJ to your preference.

2. Put the egg white powder into a bowl. Pour the liquid over the egg white powder. Beat with an electric mixer at high speed until the mixture becomes frothy.

3. Add the sugar, continue beating until the mix reaches stiff peaks. Pipe the mixture onto a parchment (or silpat lined baking sheet. Leave ~1 inch between each cookie

4. Bake for about an hour on the top rack of the oven, or until they dry, but not yet brown. Turn off the heat in the oven and open the oven door, let the meringues rest for another 30 minutes or so.

I also tried to make some Grapefruit-Champagne meringues (I’m told this is called a moonwalk?) They didn’t work. I have a feeling it’s because I put them on the bottom rack of my oven, but maybe it’s something to do with the grapefruit juice? The recipe is the same as above, but with grapefruit juice instead of OJ.

Saturday, May 24, 2008

Sugar High Friday – Grapefruit Curd filled Cupcakes with Champagne Meringue Frosting

Update: Part II of my Sugar High Friday post is here. I didn't think it merited it's own entry over at Tartlette.

This post is a little on the long side, but if you're going to make the recipe, it's worth reading what's written in the curd and frosting sections before the recipes.

I’ve decided that it’s time my blog started to get out into the world, and expand beyond its loyal reader base of 2. Getting a mention on Cupcakes Take the Cake last week was a big help, but I’ve also decided I’m going to start entering some blogging events. To that end I decided to submit an entry to this month’s Sugar High Friday, being hosted by Tartlette. The theme for the month is citrus, and of course I decided to make a cupcake. I do make other things, but I know where my strengths lie.

This cupcake was sort of an odd choice for me, mostly because I don’t like either grapefruit or champagne. This also makes me tragically unqualified to evaluate how these cupcakes taste, since what I would like in these flavors is different from what most people would. Fortunately, I do have friends who are happy to taste test them for me. I started by deciding on grapefruit, because I thought it might be something that other bloggers were less likely to use in their submissions. From there I decided that Champagne would make a nice addition, the question was how to add it. A cupcake filled with grapefruit curd was easy (in principle), but champagne frosting was another matter. Adding any significant quantity of it to a buttercream, meringue, or pretty much anything else I could think of would just lead to a runny frosting. I could use champagne flavoring, but I have no idea where to get that. I was pondering this problem for several days when the answer struck me: Powdered Egg white! Instead of reconstituting it with water, I could reconstitute it with champagne. I had no idea if this would work, and found no websites that suggested anything about it, so I figured I would go ahead and try. The results were surprisingly successful. I’ll write more about it when I get to the frosting section below, but I thought it deserved a mention in the intro.

I used a chiffon cake as the base for this cupcake. I though the light airyness of it would complement the champagne well. I tried both a chiffon with champagne and one with grapefruit juice, and I think the one with grapefruit juice tasted better. If you decide to use champagne instead or in combination with the grapefruit juice it doesn’t matter, you just want the same volume of liquid.

Grapefruit Chiffon Cupcake

Makes 20 cupcakes

1 cups + 2 Tbs sifted cake flour
3/4 cups sugar
1 ½ tsp baking powder
¼ tsp salt
3/8 cup grapefruit juice
7 ½ tsp vegetable oil (2 Tbs + 1 ½ tsp)
¾ tsp vanilla extract
4 eggs, separated

1. Preheat the oven to 325 degrees. Whisk together the flour, all but a tablespoon of the sugar, the baking powder, and the salt in a bowl

2. In a separate bowl, whisk together the grapefruit juice, vegetable oil, vanilla extract, and egg yolks

3. Pour the wet ingredients into the try ingredients and whisk until smooth

4. In another bowl beat the egg whites with an electric mixer until they begin to become frothy. Add the sugar, and continue beating until the whites just reach stiff peaks

5. stir ¼ of the egg whites into the batter until thoroughly mixed. Gently fold the rest of the egg whites into the batter until there are no more streaks.

6. Fill cupcake tins with ¼ cup measurer, bake for about 14 minutes, or until a tester comes out clean.

Grapefruit Curd

Makes a whole lot, way more than necessary to fill the cupcakes (It has been pointed out to me you can never really have TOO much fruit curd)

This recipe was a pain. I started out using the citrus curd recipe listed on Cupcake Bakeshop. However, after 4 minutes, my curd hadn’t thickened at all. Stirring all the while, I tried looking up another recipe. It told me that my curd needed to get up to about 160 degrees and that it should have the thickness of sour cream. So I stuck my candy thermometer in the mix and let it get to 160. It wasn’t the thickness of sour cream, but it had thickened, and that was good enough for me. I took it off the heat, added the butter, and put it in the fridge over night. I then went and looked up egg creams in On Food and Cooking, and discovered that the proper temperature for an egg cream is 180 degrees. Wikipedia’s recipe for lemon curd confirmed this. I went to check on my curd in the morning, and sure enough it had thickened, but not nearly enough. I put it on the stove again and threw caution to the wind, turning the heat up to medium high. This time I brought it to 180 degrees, took it off the heat, and stuck it into the fridge. Came back a few hours later to check on it, and sure enough it had thickened, basically into glue. It was delicious glue, but not something you would want to find in the middle of a cupcake. Not wanting to make another batch, and needing significantly more volume anyway (there was no way it was going to fill 20 cupcakes), I decided to go back to the original method and add whipped cream to it. I whipped up some cream with a little powdered sugar, and added the grapefruit curd. It whipped together pretty well, but was not grape-fruity enough anymore, so I added three tablespoons of grapefruit juice. That ended up coming out pretty well, but I now had way more than I needed.

Anyway, the moral of the story is that if you have your own preferred recipe, use it. None the less I will print mine here if someone else thinks they might have better luck with it

4 egg yolks
2/3 cup of sugar
8 Tbs Grapefruit juice - divided
5 Tbs unsalted butter, cut into small pieces
1 Cup whipping cream
1 Tbs Powdered Sugar
1 drop red food coloring (optional)

1. In a heavy bottomed sauce pan over medium heat, mix egg yolks, sugar, and 5 Tbs of the grapefruit juice. Stir the mixture constantly, until it reaches between 175 and 180 degrees, or coats the back of a spoon well

2. Remove from heat and pour into a bowl. Add the butter a few pieces at a time, and mix until combined.

3. Press a layer of plastic wrap directly onto the curd to prevent a skin from forming. Put in the fridge.

4. Once curd is thoroughly chilled, whip up one cup of whipping cream with the powdered sugar until stiff peaks form. Add the curd to the bowl and keep whipping until mixed. Add the remaining 3 Tbs of grapefruit juice, or as much as suits your tastes. Add the food coloring to make the mixture pink, so it looks grapefruity.

Champagne Meringue Frosting

Makes at least enough for 20 cupcakes

This frosting is interesting. I’ve never used egg white powder before, but this couldn’t be done with regular egg whites. The frosting is light and fluffy like a meringue, and tastes like champagne, because that’s what’s in it. I originally made the frosting the night before making the cupcakes, and in the morning discovered that the meringue had wept, and lost its stiffness. A few minutes of beating it on high speed and it was back where I needed it, but I noticed that a few hours later it had fallen again, though it hadn’t wept. My recommendation is that you whip this up to stiff peaks into a bowl ahead of time, but don’t put it onto the cupcakes until just before serving. Then whip the whites back to stiff peaks, and apply to the cupcakes.

1 Pkg powdered egg whites (the package I used says it contains 24 grams)
¾ cup Extra -dry champagne (you’re going to be adding sugar, don’t use sweet)
5 Tbs superfine (castor) sugar.

1. Measure ¾ of champagne (this can be tricky because of the foam). Pour the egg white powder into a large bowl, and add the champagne. Use an electric mixer at high speed to whip the mixture until it becomes foamy. Add the sugar one Tbs at a time and beat until the meringue forms stiff peaks.

Assembly

1. Use the cone method (detailed in previous posts) to fill the cupcakes with grapefruit curd.

2. Use a soup spoon to pile a mound of meringue onto the cupcake. Then use a regular tablespoon to pull the meringue out to make it interesting

3. Use a cooking torch to quickly toast the meringue, just enough so that it starts to brown. It should smell a little like roasting marshmallows as you do it.

Bold New Look, Same Great Taste!

I don't really mean for the title to this post to sound boastful, it just reminded me of something you would see on product packaging. Anyway, I have changed the look of my blog, as you can hopefully see if you are reading this. I decided to ditch the template I was using and go with something a little simpler. I also made my own banner, snazzy. The cupcake featured is the Grapefruit curd-filled cupcake with Champagne Meringue frosting (I will be writing that post as soon as I finish this).

I hope you all like the new look.

Wednesday, May 21, 2008

Late to the Game, Looking for Suggestions

I stumbled onto something called "cupcake hero" today as I was exploring various food blogs. Apparently Quirky Cupcake hosts a monthly challenge where each participant has to bake a cupcake using that month's theme ingredient. The current theme ingredient is cocoa powder. Unfortunately, entries are due by May 30th, which doesn't give me a lot of time to come up with and execute ideas, especially since I can only bake over the weekends. Here are the ideas I am throwing around so far (in the last ten minutes), but I would love some input from anyone who stops by and has suggestions.

Ideas so far

Mexican Chocolate Cupcakes: A moist chocolate cupcake with lots of cinnamon and vanilla, topped with a chocolate chili ganache. I've made these before, but not since starting the site.

Chocolate Souffle Cupcakes: Much more experimental. I've made chocolate souffle before, but have no idea how it would come out in a cupcake cup. If these turned out they could be delicious. If they failed, they could make a really large mess...

Any and all thoughts are welcome!

Spinach Gnocchi with Spicy Garlic Marinara


It's my first post that's an entree. Huzza! Of course it comes promptly after I got a nod from cupcakes take the cake. It wasn't much, but it massively upped my readership, at least for that day.

I threw a dinner party last Saturday, and decided to make a mess of food. I was only feeding six people, but I wanted to make enough to bring back to Richmond (I’m subletting a place there), and feed myself for the week. I decided to make something that would transport and keep easily. I’ve been wanting to try making Gnocchi for awhile now, so I made spinach gnocchi with roasted garlic marinara sauce. The gnocchi was pretty good, but the pasta sauce was excellent. As noted, I made ridiculous quantities of these foods. I’ve tried to reduce the recipes to more reasonable proportions here, but be aware that the pictures I’ve posted are from making a mess of sauce and 5lbs potatoes worth of Gnocci.

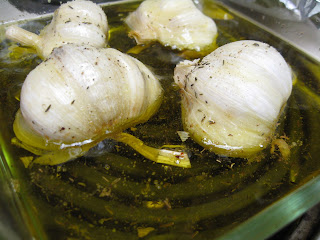
To make the pasta sauce I used home made roasted garlic and roasted garlic oil. It’s really easy to make yourself. I used the recipe here, but only made 2 heads of garlic worth.

Spicy Roasted Garlic Marinara Sauce

Should make ~4 servings

2 Tbs roasted garlic oil
1 Tbs olive oil
¼ head roasted garlic
2 cloves raw garlic, lightly crushed
1 28-oz can skinned, whole, plum tomatoes, packed in tomato juice and basil
½ tsp red pepper flakes
¼ tsp Oregano (or to taste)
Salt and pepper to taste

Here's the garlic roasted in Oil:

1. Put two tablespoons of oil in a medium sauce pan over medium-low heat. Put the roasted and raw garlic in the pan and let simmer until the garlic begins to turn golden, stirring occasionally.

2. Drain the can of tomatoes and reserve the juice (you’ll probably throw it away, but if you want your sauce to be more liquid, you can add it later. Add the tomatoes to the pan, and turn the heat up to medium high. Using a masher or a big spoon, mash up some of the tomatoes until you get the consistency you want. The heat will also break the tomatoes down.

3. Add the red pepper flakes, oregano, salt and pepper, stir to combine. Bring the sauce to a simmer, and reduce until you get a consistency you like. I probably reduced it for about 10 minutes. Stir occasionally to prevent burning.

4. Serve sauce warm over Gnocchi, or whatever other pasta you are serving.


Spinach Gnocchi

Makes 2 main course servings

1 Lbs potatoes (use Idaho or Russet DO NOT USE WAXY POTATOES)
10 oz Spinach (I used frozen)
~1 cup flour
Salt, Pepper, and Nutmeg to taste

1. Put the potatoes into a pot of boiling water. Boil for 35-45, or until tender.

2. Wilt the spinach, either by thawing it in the microwave if you’re using frozen, or by putting the spinach into boiling water for a minute, and then submerging it in ice water, if you are using fresh. Chop the spinach up very finely.

3. Once the potatoes are ready, take them out of the water and skin tem one at a time. It is important that the potatoes still be hot when they are riced, so this needs to be done quickly. Move the potatoes using tongs, and hold them using oven mitts. Chances are you will burn yourself doing this. Once you’ve taken the first potato out, you may wish to turn the heat down under the remaining potatoes.

4. As each potato is peeled, put it through a ricer. If your ricer has multiple size options, use the smallest holes available. Continue until all the potatoes are riced.

5. Mix the riced potatoes with the spinach, a generous amount of salt, the pepper and the nutmeg. Kneed the ingredients together. Add half a cup of flour, and kneed it into the dough. Different people will require different amounts of flour. Keep adding until the mixture takes on a sticky dough like quality. The best way to test when you’ve added enough flour is just to pinch off some dough, roll it into a bowl, and put it into some boiling water. If the gnocchi stays together, there is enough flour.

6. Other recipes suggest rolling the dough into long ropes ½ an inch think, and then cutting the ropes into ¼ inch segments. I just rolled the dough into small balls in my hands. Place the balls in one layer on a cookie sheet or in a casserole dish. Try not to let the balls touch each other, or they will stick

7. To cook, place the gnocchi one at a time into a pot of salted, boiling water. After a minute or so the gnocchi should begin to float. After another minute or so remove the gnocchi with a slotted spoon. Let cool and serve with the sauce.

I don't know why, but sometimes blogger automatically rotates my photos, sorry this one is sideways.

Monday, May 19, 2008

A Breakfast of Lessons Learned

This is my first attempt to join a blogging event, a breakfast themed recipe remix. I decided to make Pina Colada pancakes, an idea I had been tossing around in my head for a few years. I wanted to use pineapple rings and make the pancakes around them. Making these pancakes turned out to be more challenging than I had expected, and I learned something with each cake I made. I will recount for you briefly my experiences.

To start with I wanted to caramelize pineapple rings. I was using canned pineapple. For the first two rings I dipped them in sugar, hoping that this would make a nice layer of caramel around the pineapple. Just to see what would happen I also put an un-sugared pineapple in the pan. As it turns out, the sugar mixes with the pineapple juice in the rings, and quickly boils all over the place. The non-sugared pineapple actually caramelized much faster, and with a nicer golden-brown color.

Next came making the pancakes themselves. I’ve never been able to make those nice, perfectly round pancakes you see, probably because of the recipe I use (it’s on the thick side), but I like the taste just the same. For the first pancake I put the caramelize pineapple down in the pan first, and then poured the pancake batter over it. This turned out to be a really bad idea. Because there wasn’t a continuous layer of batter on the bottom, the pancake was impossible to flip. I ended up with a scrambled pancake with a pineapple in it. I put it in a bowl and set it aside to munch on while I was making the pancakes. Tasting that first pancake, I realized that it didn’t taste enough like coconut, and so I added shredded, sweetened coconut to the remaining batter.

Then, there was the issue of a sauce. I thought I would make a simple pineapple syrup. I put the remaining pineapple juice in a small saucepan, and brought it to a boil. I reduced the pineapple juice by about two thirds, but it never got any thicker, even after I cooled it off. As it turns out, if you want to make a syrup out of pineapple, you need to add some other things. Instead I had more of a pineapple concentrate. It still tasted good, but wasn’t thick enough to match the standard breakfast syrups.

Without further ado, here is the finalized pina-colada pancake recipe. The basic pancake recipe I based this off of is the whole wheat pancake recipe from the Tassajara bread book.

Pina Colada Pancakes

Makes ~ 10 medium to large pancakes

1 can pineapple rings packed in unsweetened juice, reserve the juice
2 cups all purpose flour
3 tbs baking powder
1 tbs salt
1 Tbls brown sugar or honey
3 eggs
1 ½ cups coconut milk
½ cup oil
1 cup sweetened coconut flakes
1-2 Tbls rum (optional)
1 Tbls butter

1. Whisk together the flour, baking powder, salt, and sugar in a medium bowl (if you’re using honey, mix it with the wet instead of the dry ingredients)

2. Beat together the eggs, oil, coconut milk, rum, and a ½ cup of the juice from the canned pineapples.

3. Set the bowls aside (don’t mix the wet and dry together yet). Put a non-stick skillet over high heat, and add as many pineapple rings as you plan on making pancakes. The juice will boil out of the rings for a moment or two. Leave the pineapples on the heat until they are a nice golden color with a little brown, and then flip, doing the same to the other side. Remove the pineapples from the pan, turn the heat off under the pan, and remove the pan from the burner (the pan needs to cool off before the pancakes are made on it).

4. Fold together the wet and dry ingredients, along with the coconut flakes. Place the pan on a burner set at medium heat. Melt the butter into the pan. Pour out pancake batter to whatever size you want. Push one pineapple ring into the batter of each pancake. Let the pancakes cook until large bubbles begin to form in the batter. Flip the pancakes, and cook until done.

Saturday, May 17, 2008

Truffle Filled Almond Cupcakes

With a recipe name like that, why bother coming up with something clever. These cupcakes may not quite be lookers (The frosting can't really spread smoothly) but all my friends agreed that these were potentially the best cupcakes I’ve ever made (the only other competitor is the tiramisu cupcakes). If you are a regular reader of this blog (who am I kidding, I know that at this point I actually only have one or two regular readers), you might remember that a month or so ago I proposed putting ads on this site to finance an almond cake I wanted to make. That didn’t work out, but I decided instead to save a little coin and make a cupcake version instead. I skipped the mascarpone frosting, and instead went straight ganache. The result was delicious. Here is the recipe as I adapted it (I only made 2/3 of the cake called for in the original recipe).

These cupcakes take some effort and some time, especially on the assembly end. I recommend making the ganache and praline the night before you make the cupcakes. That way you can let both sit out over night to come to room temperature. Don’t refrigerate the ganache over night, or it will get too firm.

Truffle Filled Almond Cupcakes

Makes 23 cupcakes

For Cake

1 cup cake flour
1 ½ tsp baking powder
½ tsp of salt
2/3 cup packed dark brown sugar
1 stick unsalted butter, room temperature
2 7-oz packages almond paste, crumbled into 1-inch pieces
5 large eggs (I actually used 4 ½ [yes, I used half an egg], but 5 would probably be fine)
2 teaspoons vanilla extract
1 ½ teaspoons almond extract

1. Preheat oven to 350 degrees. Whisk flour, baking soda, and salt together in a bowl.

2. Cream the butter with the brown sugar. Once thoroughly mixed, add almond paste, once piece at a time. Once all the pieces are mixed in, beat on high speed until fully combined. Add eggs one at a time, beating well after each addition. Beat in the extracts.

3. Fold the flour mixture into the wet ingredients. Fill cupcakes liners with ¼ cup of batter each.

4. Bake for 11-12 minutes, or until a tester comes out clean.


For Praline (I make a wet caramel, but if you prefer dry, do that)

¾ cup sugar
3 Tbsp water
½ cup oven browned-hazelnuts
½ cup oven-browned almonds

1. Preheat oven to 350 degrees. Put nuts on a baking sheet in the oven and roast for 5-10 minutes, shaking occasionally. (I just do it while the caramel is heating to the proper temperature)

2. Mix caramel and water in a heavy bottomed sauce-pan. Heat until the sugar reaches a nice amber color (I measured 300 degrees on my candy thermometer). Mix the nuts into the caramel, and shake gently to mix. Pour out onto a silpat or parchment paper to let cool.

3. Once praline is thoroughly cooled, break it into a few large pieces and put it into a food processor. Pulse until praline is partially powder, and partially small chunks. Set aside


For chocolate-chunk Ganache

2 ¼ cups heavy cream
3-4 cups semisweet chocolate chips
2 Tbs Frangelico
2 Tbs powdered sugar

1. Put two cups of the chocolate in a heat proof bowl. Heat the cream over medium heat until it begins to bubble. Pour the cream over the chocolate and let it sit for a few seconds, then begin to stir the chocolate into the cream. At this point it should be pretty thin. Continue adding the chocolate 1 cup at a time, and stirring until it is fully melted. When you add the last cup, the cream should have cooled too much to melt the chocolate completely, and you will be left with small chunks of chocolate in your mixture. Add the Frangelico and mix to combine.

2. Pour the mixture out onto a parchment or silpat lined baking sheet. Let the ganache come to room temperature (I left it out over night).

3. Carve 23, teaspoon sized truffles out of the ganache. Use your hands to roll the truffles into balls, and then roll the balls in the praline. When this is done, you should still have between ½ and 2/3 of your ganache left, as well as plenty of praline. Set the truffles and extra praline aside for later.

4. Place the remaining ganache in the bowl of a stand mixer with the whisk attachment. Whip the ganache on high speed. As it whips up, it should turn a lighter color. Add the powdered sugar and the remaining ¼ cup of cream and continue beating until well mixed. This will be your frosting.


Assembly

1. Use the cone method to hollow out the cupcakes. Place a praline covered truffle into each cupcake, and place the top back over the hole.

2. Spread the frosting onto the cupcakes. Because of the chocolate chunks in the ganache, the frosting really isn’t pipeable, and won’t really spread on smoothly.

3. Sprinkle the remaining praline over the top of the cupcakes.

Monday, May 12, 2008

Simple Chocolate Cupcakes with Swiss Meringue Butter Cream


For a website titled Amicus Cupcake, this blog has had surprisingly few cupcake recipes. Of course, as I said in my initial posting, this is not a blog devoted exclusively to cupcakes, or even to baking (though you wouldn’t know it from my postings thus far). However, there is a reason that I choose a cupcake related name for this blog, and that is that cupcakes are my bread and butter. When I want to make a dessert to bring somewhere I make cupcakes. After all, they’re easy to make, easy to transport, easy to serve, and everybody loves them.

A few nights ago my friend Paul had an end of the semester BBQ to celebrate the completion of our 1L year. I decided I should bring cupcakes, I figured it was fitting since I had brought cupcakes to the beginning of the year potluck as well. I wanted a recipe that would make something simple, but delicious, and so I decided to adopt the cake recipe from my Swiss roll attempt. Even if that cake hadn’t turned out as a visual stunner, it was still delicious. I doubled the recipe so that it would make enough cupcakes (doubled it actually made exactly thirty). Then came the question of how to frost them. I didn’t want to use the mocha butter cream I had used for the Swiss roll, not for taste reasons (it was delicious), but because the recipe called for 6 egg yolks and 4 sticks of butter, and to make enough to frost thirty cupcakes would probably require at least double that, and I really wasn’t interested in stopping my friend’s hearts. Instead I settled on a Swiss Meringue Butter Cream frosting from How to Eat A Cupcake. To mix things up a little, I would make half vanilla and half chocolate frosting.

I was really happy with how these cupcakes turned out. I was afraid that since this cake recipe was originally from a recipe for a jelly roll that it might not rise enough, but it turned out not to be a problem at all, and the cupcakes rose happily in their cups. When these cupcakes come directly out of the oven, they are very fragile, and you should be careful with them. I dropped one on the floor, and it exploded into pieces. But, after these cakes have had a little time to cool off, and especially if they’ve spent some time in the fridge, they firm up very nicely.

Chocolate Cupcakes

2 Sticks of butter
4 tsp instant coffee
1 ½ cups of water
1 ½ cups of semisweet chocolate
2 cups sugar
2 eggs
2 ½ cups all purpose flour
2 tsp baking powder
4 TB Cocoa powder

1. Preheat oven to 375 degrees, line a cupcake pan with liners (enough to make 30, if you have the pans for it)

2. In a large saucepan set over low heat, stir together the butter, instant coffee, water, chocolate and sugar until smooth. Remove from the heat and let cool 10 minutes.

3. Whisk in the egg, flour, baking powder and cocoa powder until incorporated.

3. Fill cupcake liners with ¼ cup of batter each. Bake for 13-15 minutes, or until a tester comes out clean. Take the cupcakes out of the oven, and let them cool in their pans for at least 10 minutes. Remove the cupcakes from their pans and continue letting them cool on wire racks. Once they’ve cooled off, put them in airtight containers and move them to the fridge.

Vanilla and Chocolate Swiss Meringue Butter Cream

4 large egg whites
1 ¼ cups of sugar
2 Sticks unsalted butter, softened
2 tsp Vanilla Paste (you can use the extract instead, the paste just gives it a more substantial vanilla flavor)
1/3 cup semisweet chocolate
1 ½ Tbs Cocoa Powder

1. Put egg whites and sugar in a bowl over a double boiler. Whisk the eggs until they are foamy and warm to the touch (about 160 degrees)

2. Remove the egg whites and sugar from the heat, and pour them into the bowl of a stand mixer with a whisk attachment. Turn the heat off under the double boiler. Put the chocolate in another bowl, and put it over the double boiler to melt. Once the chocolate is melted, remove it from the heat and set it aside.

3. Whip the egg white and sugar mixture on high speed until the eggs reach stiff peaks (I didn’t let mine get all the way to the stiff peaks phase, and as a result the frosting wasn’t really pipe-able).

4. Once the eggs have reached stiff peaks, replace the whisk attachment with the paddle attachment. Add the butter two tablespoons at a time, beating well after each addition. Once the butter is fully incorporated and the frosting is smooth, add the vanilla paste, and beat until combined. Reserve half the frosting at this point, or just frost half your cupcakes.

5. On medium speed, beat the melted chocolate and cocoa powder into the remaining frosting. Beat until well combined. Frost the remaining half of your cupcakes.

Thursday, May 8, 2008

Done with 1L Year!!


It’s done! Yesterday I took my last final of the semester and finished my first year of law school. Over the next day or so most of my friends will finish up as well. But in the meantime, while they’re all still studying, I need something to do. So this morning I decided to make banana bread. I think the recipe I made turned out pretty well, although it could stand to be a little more banana-y. The recipe I used also called for an 8 x 4.5 inch loaf pan, which I don’t have, so I used a 9 x 5 inch loaf pan instead. The result was that the loaf was sort of low and wide, but it still came out just fine.

Banana Bread with Peanut Butter and Milk Chocolate Chips

1 Cup all purpose flour

1 tsp Baking powder

½ tsp Baking soda

¼ tsp salt

2 medium, well ripened bananas

¾ Cup packed brown sugar

1/3 Cup peanut butter, crunchy or creamy depending on preference (I used crunchy)

¼ Cup plain, nonfat yogurt

1 Large egg

1 Tbsp Vegetable Oil

½ Cup milk chocolate chips

1. Preheat oven to 350 degrees. Mix flour, baking powder, baking soda and salt in medium bowl

2. In a large bowl, mash the two bananas, mix with the sugar, peanut butter, yogurt, egg, and vegetable oil. Mix until smooth.

3. Mix the dry with the wet ingredients. Fold in the chocolate chips. Pour batter into a greased 8 x 4.5 inch loaf pan. Bake for between 40-50 minutes, or until a tester comes out clean.

4. Let the loaf cool on a cooling rack in its pan for 15 minutes, then remove the loaf from the pan and continue allowing it to cool. Enjoy.

Tuesday, May 6, 2008

Best Popcorn Ever


I know that may seem like a boastful name for a blog posting, but this popcorn recipe has earned it. I began making it for my friends a few months ago, and it caught on fast. People liked it so much that I continued getting compliments on it the next day (who gets compliments for popcorn at all, not to mention the next day). The recipe uses some ingredients that might be hard to come by (I don’t know because I’ve never looked for them other than where I get them). The recipe relies on granulated roasted garlic and Vermont cheese powder. The two ingredients together really give this popcorn some zing. Truthfully, there is no particular recipe for this, you just add the spices until it tastes right. However, I’ve done my best to reproduce it below.

Garlic-Cheddar Popcorn

Canola Oil
2/3 Cup unpoped popcorn kernels
~7 Tbls Vermont Cheese Powder
~5 tbs Granulated Roasted Garlic (you can use garlic powder in its place, but the roasted is better)
~ 1 ½ tbs chili powder
4 Tbs melted butter (optional)


1. Pour enough canola oil into a large pot to coat the bottom. Place over medium high heat with 3-4 kernels in the pan. Heat, covered, until the kernels pop, then add the rest of the popcorn, and reduce the heat the medium. Make sure to recover, and wait for all of the kernels to pop, agitating the pan occasionally. Note, if you prefer air popped or microwave popped popcorn instead, do that.

2. Once all the kernels have popped, remove the pan from the heat. Add the butter at this point if you’re going to use it, it will help the spices stick to the popcorn. Add about half the cheese powder, granulated garlic, and chili powder, and mix the popcorn. Add the other half of the spices and mix again.

3. Pour into a bowl or serve right out of the pot, and enjoy.

Saturday, May 3, 2008

And the Winner Is...


All the votes are tallied and all the cupcakes are eaten. And while both the Bon-Appetite lemon-raspberry cupcakes and Beth's lemon-raspberry cupcakes were delicious, Beth's cupcakes were the winner by a unanimous vote. The cake was light, fluffy, and extremely moist, while holding onto a nice lemon flavor. The filling of whipped cream with fresh raspberries in it was also more impressive than the simple raspberry jam used in the Bob-Appetite cupcakes. Lastly, when it came to the frosting, a glaze can just never compete with a nice buttercream. All in all the tartness of the lemons contrasted nicely with the tartness and sweetness of the raspberries in a cake that just couldn't be beaten. Both cupcakes made a good showing, but if I had to pick one recipe to make again, it would be Beth's